Renoise automation and multiple send tracks
There are at least two ways to apply a set of effects to a collection of tracks.
One is to place the tracks into a group; all filters and effects on the group are applied to the individual tracks.
Another way to use send tracks. As with a track group, any filter or effect applied to a send track is applied to the signal of all tracks routed through it.
These two are similar but not identical. Which one you use (and you can use both in assorted combinations) depends on what you are trying to do. You’ll have to read the docs and play around to get a real sense of how they work.
The option to apply a common set of effects to multiple tracks seems to be about the same for each, but there’s something you can do with send tracks that (as best I know) you cannot do with a track group: automate the selection of send tracks to be used at any given point in the song.
There are times in a piece when, for good effect, you want to keep the same set of notes on one or more tracks but apply a different set of filters and effects.
Setting up some send tracks
A default Renoise song will have one send track, named S01, to the right of the master track. You can add more send tracks by selecting any existing send track and, using the menu, select Edit -> Insert Track. Or you can use the keyboard shortcut, ctrl+t.
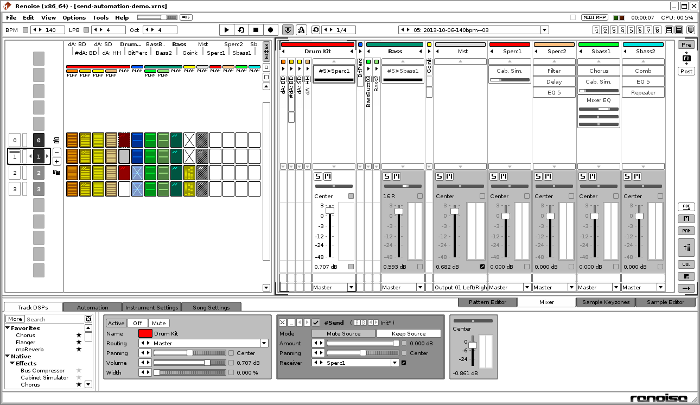
For a demo track (pilfered from an early version of A Temporary Lattice, from the upcoming Neurogami release, Maximum R&D) I set up four send tracks. Two for percussion, and two for the buzzy bass.
Most of the percussion tracks have been placed into a group call “Drum Kit”; the group has been given a Send routing device. The bass tracks are also in their own group, with the group routed to one or another send track.

Automation
The Send routing device has a “Receiver” option. This is a drop-down list of the currently defined send tracks. Next to it is a little check-box. This is for automation. Click it and you should be taken to the automation editing pane.
This is the tricky part: The automation values should correspond to an actual send track. The automation window, however, does not show the names of send tracks, but their index number. Numbering starts at 0, so at the very start of the very first pattern the “Drum Kit” group the Receiver" automation envelope needs to be set to 0. (Note: If you end up, either by choice or accident, indicating a send track index that does not refer to a defined send track, then it is the same as using no send track at all.)
Click on “Draw” to allow editing. Click someplace in the automation window. The goal is to get a marker right at the very start, with a value of 0; this is very hard to do straight off. But if you just get any marker value set you can then again click “Draw” to turn of the creation of new envelope markers. Now you can click on the marker you just added and drag it over to the left and down. As you move the marker up or down you should see a little square above it with the current value.

This value changes as you move the marker. Move the marker down until it shows 0. By the way, the marker value also appears in a window along the bottom of the envelope edit window; you can watch this as a song is playing to see the current active value for that pattern.
If the Send device “Receiver” envelope in a given pattern does not have an explicitly set value then that windows will show “no value”; whatever value was the last set is what is active. This means the initially assigned send track will be used until something changes it.
Since the demo song exists only to have a tangible example of this technique it is only four patterns long. The drum kit uses send track “Sperc1” for the first two patterns, but for the last two it should change to send track “Sperc2”.
As before, the “Receiver” automation envelope for the “Drum Kit” group Send track in pattern 2 gets an automation marker. This time the value is set to 1 (i.e. the second available send track).
You can grab the demo xrns file to see how main and send tracks were set up.
The bass group is handled the same way. There are two send track (“Sbass1” and “Sbass2”) set up for the bass lines; the automation envelope references them as send tracks 2 and 3.
As with the drum kit the bass group gets a change of send track in the first and third patterns.
That’s it.
Really, there’s not much to it, but it’s a useful technique to manage interesting effect changes, especially if you’re doing beat or groove-based music.
After some playing around I decided to use the send tracks to shift the drums and bass from a distinct foreground quality to a more subdued background sound, which allowed me to add additional instruments to take over as the focus of the piece.
If you are planning on jumping around among patterns you may want to be sure that each group pattern specifies a send track. Or leave some patterns without a set send track; as you jump from one pattern to the next whatever was the last-specified send track will be the one used, whihc can lead to some interesting results.
You can read more about send tracks here.
UPDATE
“After Machine Flight” is a recent track that uses this technique.
UPDATE 2
There’s a better way to automate the selection of send tracks.
Watch this video about different ways to handle automation.
Adjusting the receiver for a send device using the graphical automation window is tedious. It is so much more precise to use the FX button.
Position you cursor at the line in the pattern where you want the receiver to change.
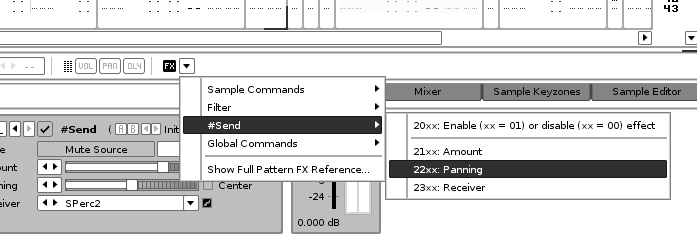
When you click the FX button you can navigate a menu that looks something like this:

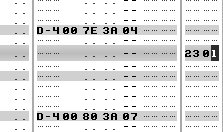
Select “Receiver”; this inserts a command to set the receiver to the current value.

Then edit the last two digits to refer to the desired receiver.